Showing posts with label sewing. Show all posts

Tuesday, 12 November 2013

Elephant No. 71: Polymer Clay Buttons


I made an elephant button for the original Elephant a Day blog, but I was at a meeting today where this activity was being offered, so I figured it was time to try it again.

I began by rolling some sparkly acid yellow into a log shape, thinking I would make a series of buttons from a bunch of discs. Then I decided not.


Instead, I smushed the yellow together again, and shaped it into a vague elephant shape. I then rolled it flat with a piece of PVC pipe, reshaping the edges a bit as I went.


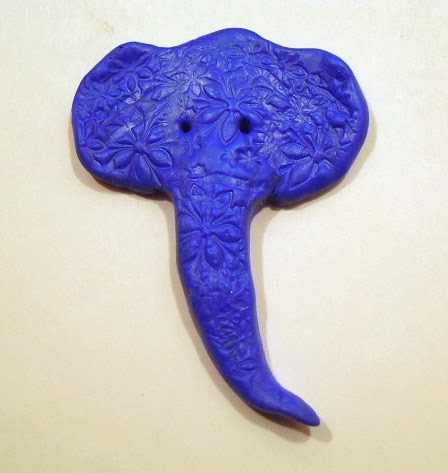
Because this stuff can be stamped with rubber stamps, I found one with a pretty floral pattern and randomly covered the surface of the elephant with overlapping flower imprints.


I then reshaped the edges again and poked an eyehole into it with a toothpick. To give the elephant some delineation, I pressed a couple of lines into the surface. To finish up, I pierced it with a cake tester in two places to give me sewing holes.


This wasn't completely hideous, and I had lots of time left, so I made another elephant in blue.


And a rather garish red.


After this, they needed to be baked in a 230˚F (110˚C) oven for about 20 minutes.

Obviously there's no buttonhole on earth that could accommodate any of these, so they're just decorative. Decorative, highly abstract, and somewhat silly, but I still like them well enough to keep them around.


Elephant Lore of the Day
I was surprised to learn today that the first buttons to be placed in the ears of the famous Steiff teddy bears—and the company's other stuffed toys—featured an elephant.


Original Steiff ear button, 1904–1905.
Source: http://www.worthpoint.com/blog-entry/identify-
early-production-steiff-bears-1892-1929


Beginning in 1904, all Steiff bears left the factory in Glengen, Germany with a metal button in their ears. In that first year, as well as in 1905, the small brass button featured a tiny elephant. Similarly, the early cardboard tags worn around the bears' necks also featured an elephant.


Early Steiff chest tag.
Source: http://www.worthpoint.com/blog-entry/identify-early-
production-steiff-bears-1892-1929


By 1906, the elephant was gone, and subsequent Steiff buttons were blank, then imprinted with an "S", and finally the word "Steiff".


A Steiff teddy bear, ca. 1920.
Source: http://www.worthpoint.com/blog-entry/identify-early-
production-steiff-bears-1892-1929


Why an elephant? Interestingly enough, the company that became famous for its teddy bears was famous first for its toy elephants.

In 1880, Margarete Steiff found a design in a magazine and made elephant pincushions for her friends. Discovering that children were playing with the pincushions, she began producing elephants and other animal toys for children.


One of Margarete Steiff's first elephant pincushions, ca. 1880.
Source: http://needleprint.blogspot.ca/2013/03/steiff-
elephant-pincushions.html


It wasn't until 1902 that Steiff created its first teddy bear. By 1907, the company was manufacturing nearly a million bears a years—a number that has increased every year since.


A modern replica of the first elephant pincushions manufactured by Steiff.
Source: http://needleprint.blogspot.ca/2013/03/steiff-elephant-pincushions.html


To Support Elephant Welfare

Monday, 23 September 2013

Elephant No. 21: Cloth Doll


I came across a magazine at the bookstore last week called Prims, which features interesting folk art dolls and animals by various artists. Although there were no elephant dolls in the magazine, I bought it anyway—as much for the inspiration it provided as for the technical information it contained.

I began by drafting a pattern for myself. My pattern was admittedly eccentric, but I was pretty sure it would work well enough for what I had in mind. On the other hand, I've never made a cloth doll before, so I'm not sure why I thought I could make one based on some pictures in a magazine.

I began by cutting out everything in unbleached muslin.


Next, I stitched up the following parts: body, arms, legs and trunk. I originally had another idea for the ears, so didn't stitch them until later.


I sewed the arms and legs in tubes, then flattened them so that the seams would be on the inside of the body, where they would be seen.


For the trunk, I inserted a length of wire—bent over itself on both ends to keep it from poking through.


Finally, I stuffed everything firmly.


I assembled everything by by whipstitching all the openings, attaching the legs flat, and the trunk and arms as you would an inset sleeve.


Now that everything but the ears was attached, I rethought my original plan for the ears, which had been to leave their edges raggedy. Instead, I stitched them on the sewing machine, turned them, and attached them with whipstitching.


I thought this was fun as is, but I wanted to give it more of a ragdoll look, so I gave the whole thing a light wash of grey acrylic paint. I let everything dry for about half an hour, then painted pink inside the ears, at the tip of the trunk, and on the toenails.


I hadn't decided yet whether I would paint eyes or add beads or buttons, so I left that decision for later, once the personality of the elephant became a little more clear.

Now came the fun part: dressing up the elephant and giving it a personality. My original idea was to stitch or glue things to the elephant's body to give it a sort of folk art look. I tried tying on ribbons and bits of felt to create both boy and girl elephants, but nothing really pleased me. Then I realized that it was because the elephant didn't have the folk art look I had expected. I changed gears and decided instead to dress the elephant up like a more conventional doll.

I drafted a sleeveless dress pattern, cut it out of unbleached muslin, seamed it up the back, and hand-hemmed all the raw edges. I must be insane.


Because I'd made the dress of plain muslin, I decided it should now be handpainted. I stuffed it with paper towels, and painted a striped design, not caring much about precision and paint bleed. I let that dry for about an hour, then used the hairdryer on it to make sure it was really dry. To finish the fabric design, I added some abstract flowers, and left it to dry again.


Once the dress was dry, I began embellishing it with ribbon and buttons. I'd put the dress on the elephant to give me a better sense of proportion, but was careful not to stitch the dress to the elephant.


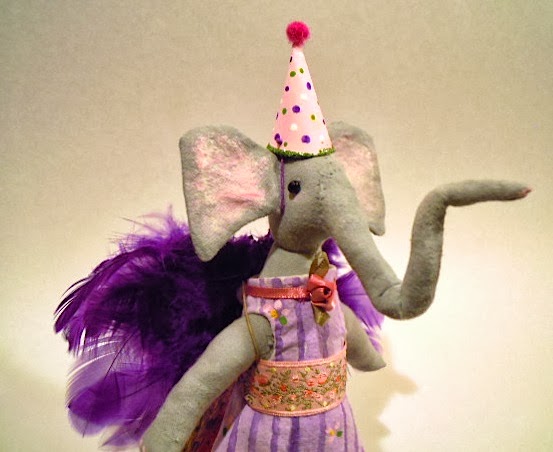
I decided now that the elephant looked like she was going to a birthday party, so I gave her angel wings, looped over her shoulders, and a party hat.

For the wings, I used this tutorial by Milky Way Photography for inspiration. I decided her wings should be purple.


For the hat, I used this template by First Palette to give me the general shape.


This is what she looked like with just the party hat. Pretty cute.


And this is what she looked like with her wings. Also cute, I thought.


It took me hours to make this, partly because I was drafting my own patterns, and partly because of the amount of hand-stitching involved. That being said, I love this little elephant, and might even make another one sometime.


Elephant Lore of the Day
In August of this year, six-tonne Anarkali the elephant got into trouble when she went for a bath in the lake outside Amer Fort in Jaipur, India.

Anarkali is helped back to shore, Jaipur, India, 2013.
Photo: ©Dainki Bhaskar/Barcroft India
Source: http://www.dailymail.co.uk/news/article-2391226/Indian-rescuers-
save-tonne-ELEPHANT-drowning-lake.html


Wandering away from the shore on her own, she became trapped in a pocket of deep water, and was in danger of drowning. Confused and afraid, she seemed unable to figure out how to free herself.

Her owner quickly boarded a motorboat to the stricken elephant. Climbing onto her back, he managed to help her free herself. Anarkali was then guided by her owner and two small boats to the shore, where she was greeted by scores of tourists.

To read more, click here.

Anarkali is greeted onshore by scores of onlookers.
Photo: Dainik Bhaskar/Barcroft India
Source: http://www.dailymail.co.uk/news/article-2391226/Indian-rescuers-
save-tonne-ELEPHANT-drowning-lake.html


To Support Elephant Welfare
Boon Lott's Elephant Sanctuary (Thailand)
Wildlife SOS (India) 
 
The Elephant Sanctuary (Tennessee)


Thursday, 12 September 2013

Elephant No. 10: Little Stuffed Elephant


My friend Sylvie Morel sent me a link a couple of days ago to the cute little elephant below. Sylvie's great for pointing me to fun little elephant projects, and this one looked easy, so I thought I'd try it today.


Original elephant pattern and instructions (no written instructions).
Source: https://www.facebook.com/pages/
ID%C3%89ES-De-G%C3%89NIE/317020751758213

It's a simple design, so instead of using the original pattern, I drew something similar.


I cut out two elephant shapes from a piece of faded vintage linen, along with two pieces of off-white felt for the ears.


I started by placing the right sides of the two elephant pieces together and stitched them with a quarter-inch (0.6 cm) seam, leaving an opening at the back. I clipped the curves, but you could also use pinking shears as they did in the original.


I turned it inside out.


I stuffed it lightly, then stitched up the opening at the back.


The ears were made of felt, so they didn't need anything more than a blanket stitch around the outside to help them hold their shape and to make them look pretty. I chose a colour of embroidery floss that went with the linen fabric, and used three strands. I also used the blanket stitch to attach the ears to the head.


For the tail, I took six strands of the same colour of embroidery floss, sewing through the back of the elephant, knotting the strands where it was attached, and braiding the tail in three groups of four strands. At the bottom, I tied a simple knot.


For the eyes, I was going to use seed beads, but decided instead to embroider them with three strands of embroidery floss.


This little guy was really easy to make, and took only about two hours, including drawing the pattern, cutting out everything and dragging out my sewing machine. You don't even need a sewing machine for something this small, although it helps to give you a seam strong enough to hold the stuffing. The other option would be to top-stitch the elephant with embroidery floss or contrasting thread, and let the edges fray a little.


I'm not the kind of person who normally makes little things like this, but I quite like it, and it would probably make a great bazaar or charity item.


Elephant Lore of the Day
Local photographer Neil Robertson often sends me interesting elephant images he comes across. Yesterday, he sent me this one, featuring child actor Dickie Moore (of the Our Gang comedies) with a baby elephant.


Dickie Moore with baby elephant.
Source: http://huhmagazine.tumblr.com/post/9803512682


At first, I thought, "A baby elephant? In an Our Gang movie?" Then I thought, "Maybe it's from a circus movie or something." It never occurred to me to assess the size of the elephant in this photo.

A quick online search revealed the image below—obviously the original, featuring the Our Gang/Little Rascals dog, Pete the Pup.


Dickie Moore with Pete the Pup, in an unnamed Our Gang comedy, ca. 1933.
Source: http://classiccinemaimages.com/dickie-moore/dickie-moore/

Since baby elephants weigh around 200 pounds (91 kilograms) at birth, the elephant in the picture above would have to be either the smallest baby elephant ever born, or Dickie Moore would have to have been a very large child. Although I couldn't trace the original source of the elephant image, it's a nice piece of "fauxtography"—and I, of course, kind of prefer it to the original.

To Support Elephant Welfare
Boon Lott's Elephant Sanctuary (Thailand)
Wildlife SOS (India) 
 
The Elephant Sanctuary (Tennessee)